William Blacker’s Winged Larva
If you are interested in the history of our sport and especially the art of flytying, there is no greater thesis on the subject than William Blacker’s “Art of Angling”.
There are many versions of this classic volume that can be purchased for a few pounds or if you fancy an early collectors edition was sold at Bonhams in 2020 for a mere £11.475.00!
Here is one of Blacker’s classic patterns that caught my attention. I’ve put together a version of his Winged Larva that you might find of interest.
When I first read the tying steps for the assembly of this historic fly it struck me that I might well be out of my depth, so I sent a copy to my friend Ian McKenzie, ex technical director of Fulling Mill. His reaction was as expected and totally unprintable!
The following steps are the result of a two-hour meeting and a lot of laughing!
For those of you who would rather not grope around inside a Salmon carcass, may I suggest a slightly more up to date solution? Nip down to Hobby Craft and buy a nice sheet of cream closed cell foam…60p!

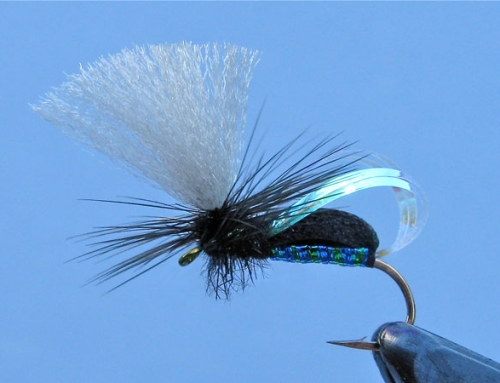
With respect to the great man here are the tying steps for my version of the Winged Larva that I fished with success over the years. It’s definitely one for the box!
You will need:
Hook: Tiemco 2302. Size10.
Thread: Brown 8/0.
Tail and detached body: Closed-cell foam and 2 paint brush bristles.
Hook body: Seals fur. Rib yellow Flexifloss.
Wing: Woodcock.
Hackle: Long Partridge Hackle.
Head: Peacock Herl.

Step One
Place a needle in the vice and tie 2 paintbrush bristles on top to form the tails.
Trim a 2mm square strip of closed cell foam to a point and tie in at the base of the tails.
Take the thread under the foam, once around the needle and twice back around the foam to form the first segment.

Step Two
Continue down the needle in the same manner slightly enlarging the segments until you have made 5.
Whip finish, behind the final segment, snip the thread and taking a firm grip pull the detached body off the needle.
Split the tails and fix with a little Bug-Bond.
Seal the underside of the body with a little varnish.

Step Three
Run the thread down the shank to a point above the barb and back to approximately 4 mm behind the eye.
Tie in the Flexi floss rib securely, stretch and tie in along the shank.
Apply your dubbing, form the body, rib with the Flexifloss in an open spiral and tie off.
Tie in the detached body under the shank with the tails either side of the hook.

Step Four
Cut two wing slips from a Wood Duck feather and tie in either side of the hook against the dubbing.

Step Five
In front of the wings tie in a long Partridge hackle and holding back the fibres with every turn, wind forward and tie off.
Tie in three strands of peacock herl and either plait or twist into a rope.
Tie off add a little varnish and thank Mr Blacker for an interesting idea!